On this day 50 years ago the battle of Fire Support Base ‘Coral’ began, the largest land battle fought by Australian forces during the Vietnam War.
Australian soldiers were first deployed to South Vietnam in 1962 as a small training team (the AATTV). In 1965 a Battalion Group, based on the 1st Battalion, The Royal Australian Regiment (1 RAR) was attached to the US 173rd Airborne Brigade. In 1966 Australia’s commitment was increased to a Brigade, the 1st Australian Task Force (1 ATF), units of which fought their first major action at Long Tan in August that year.
During the ‘Mini-Tet’ offensive launched by the Viet Cong (VC) and North Vietnamese Army (NVA) in May 1968 1 ATF deployed two of its three battalions to an area 20 kilometres north of Bien Hoa to intercept and disrupt enemy forces withdrawing from Saigon and the Bien Hoa–Long Binh base complex.
A number of fire support bases (FSB) were established to provide temporary defensive positions with Artillery and Mortars in order to support infantry foot patrols from 1 RAR and 3 RAR. One of these FSBs was called ‘Coral’ located seven (7) kilometres north of the town of Tan Uyen.
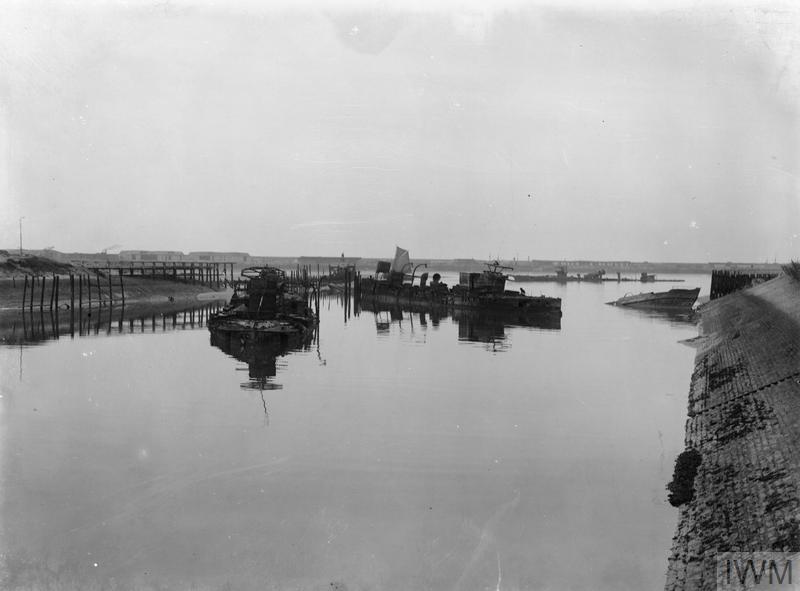
The occupation of FSB Coral (shown above) began on 12 May 1968. Early the following morning at 3.30am the base was attacked by the NVA and VC with the Mortar Platoon of 1 RAR and Number 6 Gun (an M2A2 Howitzer shown below) of 102 Field Battery over-run. The attack was beaten off by 6.30am and the captured positions retaken. Eleven Australian soldiers were killed and 28 wounded with 52 NVA/VC bodies left behind on the battlefield. A further three Australians died in patrol clashes around FSB Coral on 14 May.
At 2.30 am on 16 May 1968 FSB Coral was attacked again by a much larger force of three (3) battalions of NVA. Coral was now defended by M113 Armoured Personnel Carriers (APCs) of A Squadron, 3rd Cavalry Regiment (3 CAV) and 1 RAR’s rifle companies. All of these positions were heavily engaged with part of the A Coy 1 RAR position lost before the enemy was forced to withdraw. The attack was repelled after four hours of fighting, with the Australians losing five (5) men killed and 19 wounded. Two (2) members of an American artillery battery which had reinforced the base were also wounded. Only 34 enemy bodies were recovered, but blood trails and drag marks indicated that many more casualties had been removed.
On 22 May FSB Coral was subjected to yet another rocket and mortar barrage, but this time the NVA troops were dispersed by mortar fire from 1RAR mortars as they formed up to attack.
Although there were further bombardments on 26 and 28 May, with numerous patrols sent out coming into contact with the enemy, FSB Coral was not seriously threatened again.
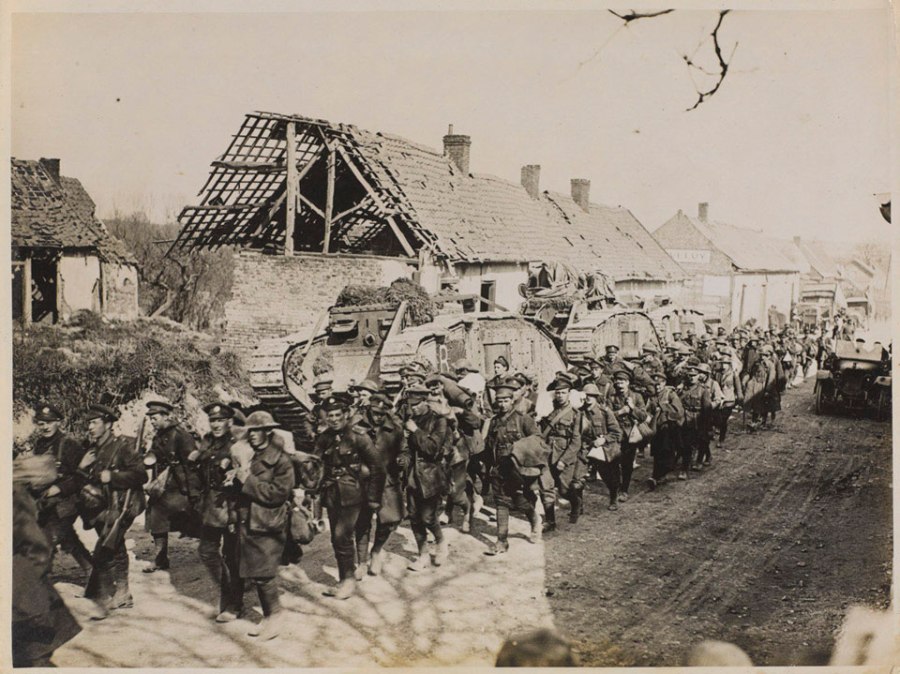
During fighting on 26 May a Troop of Centurion tanks from C Squadron, 1st Armoured Regiment deployed outside the perimeter wire with infantry support and engaged and destroyed a significant portion of an NVA bunker system.
Enemy efforts shifted on 26 May to another FSB named ‘Balmoral’ 4.5 kilometres north of Coral occupied by 3 RAR and Centurion tanks. The defenders threw back assaults launched against FSB Balmoral on 26 and 28 May 1968.
On the forttieth anniversary of the Battle of Coral in 2008, the then Governor General of Australia His Excellency Major General Mike Jeffrey AC, CVO, MC presented 102 Battery Royal Australian Artillery (RAA) with the Honour Title ‘Coral’ (see below). 102 Battery is the first Australian Artillery unit to be awarded an Honour Title, which are common in the British Army and are the Artillery equivalent of Battle Honours.
102 (Coral) Battery RAA remains on the Australian Army Order of Battle and currently is a Gun Battery equipped with the 155mm M777A2 towed lightweight howitzers (see below) and part of the 8th/12th Regiment RAA. You can find out more about the Regiment here: https://www.army.gov.au/our-people/units/forces-command/1st-brigade/8th12th-regiment
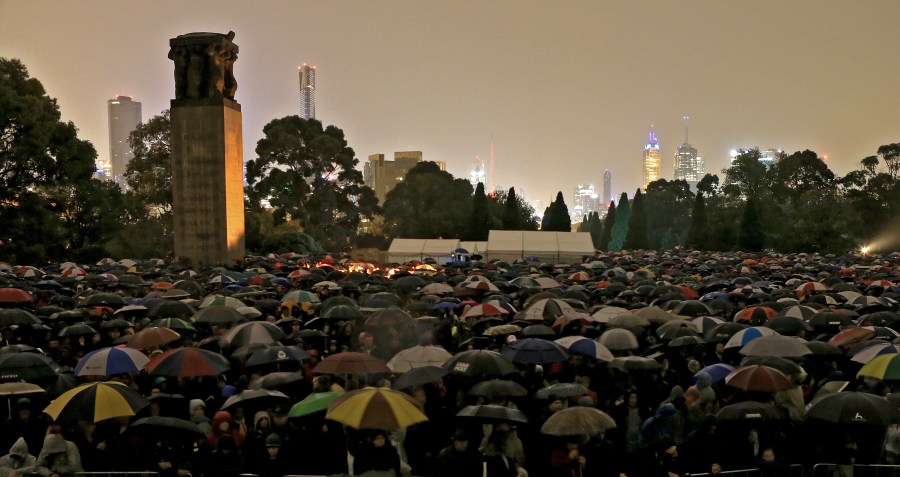
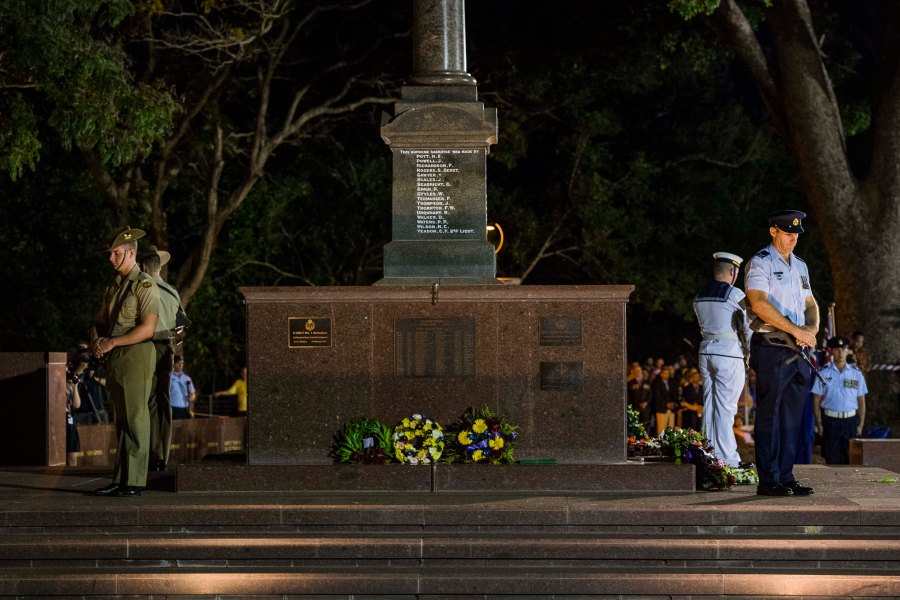
Anzac Day is traditionally held on 25 April each year throughout Australia and New Zealand as a day to remember all those who have served and died in war, conflict or peacekeeping operations.
On that day in 1915, Australian and New Zealand forces (called the Australian and New Zealand Army Corps or ‘ANZAC’) landed with other British and French troops on the Gallipoli peninsula in an attempt to knock Turkey out of the war.
The 25th of April was officially named Anzac Day in 1916 and for the remaining years of the First World War was commemorated with parades and commemorative church services.
During the 1920s, Anzac Day became established as a National Day of Commemoration and in 1927 Australian states observed some form of public holiday together on Anzac Day for the first time that year. By the 1930s all the rituals now associated with Anzac Day including dawn vigils, marches, memorial services, reunions, and games like two-up were firmly established.
One of the more poignant events held on every Anzac Day is the ‘Dawn Service’ with the first organised service held in 1928 at Martin Place in Sydney. The impetus for the event came the previous year when a group of returned servicemen returning at dawn from an Anzac Day function held the night before came upon an elderly woman laying flowers at the as yet unfinished Sydney Cenotaph. Joining her in this private remembrance, the men later resolved to institute a Dawn Service the following year. Some 150 people gathered at the Sydney Cenotaph in 1928 for a wreathlaying and two minutes’ silence and the modern tradition was born.
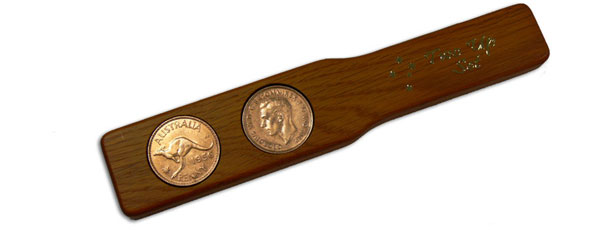
Another well known tradition held on Anzac Day is the game ‘two-up’. The origins of the game are obscure but it is thought to have evolved from ‘pitching pennies’, a gambling game where a single coin is tossed against a wall with the closest to the wall winning the bet and collecting all of the coins, which was popular with the British working class and had been played by British and Irish convicts since the arrival of the First Fleet in 1788.
‘Two-up’ involves someone acting as the ‘Spinner’ using a ‘kip’ (a small piece of wood on which the coins are placed – see above) to toss two Australian penny coins in the air. Other players surround the ring and bet on the result – either heads or tails. ‘Odds’, where a head and tail results, means the ‘Spinner’ throws again.
One hundred years ago today, on St George’s Day 1918 the Royal Navy (RN) carried out an audacious raid on the German held port of Zeebrugge in occupied Belgium. It was the first Commando raid in history.
In February 1915 Germany declared the waters around the UK and Ireland to be a war zone with any British merchant vessels encountered at risk of being sunk. Germany realised that they could not compete with British naval strength and that the only possible way they could impose a blockade on Britain was using the U-boat. Germany’s U-boat force was primarily based in Ostend in Belgium giving them good access to the sea lanes around the UK.
Throughout the remainder of 1915 and 1916 German U-boats sank over 3.6 million tonnes of Allied and Neutral shipping and it was not until April 1917 that Britain introduced a convoy system to provide some element of protection.
Despite its introduction German U-Boats remained a serious threat to Allied shipping throughout the remainder of 1917 and into 1918. Many were based in occupied Belgium, particularly Bruges, from where U-Boats and Torpedo Boats could make their way through the canal system into the English Channel at the port of Zeebrugge.
In late December 1917 Rear Admiral Sir Roger Keyes (shown above) took over command of the Dover Patrol and soon set his sights on Bruges and began planning a raid on its ports, Zeebrugge and Ostend.
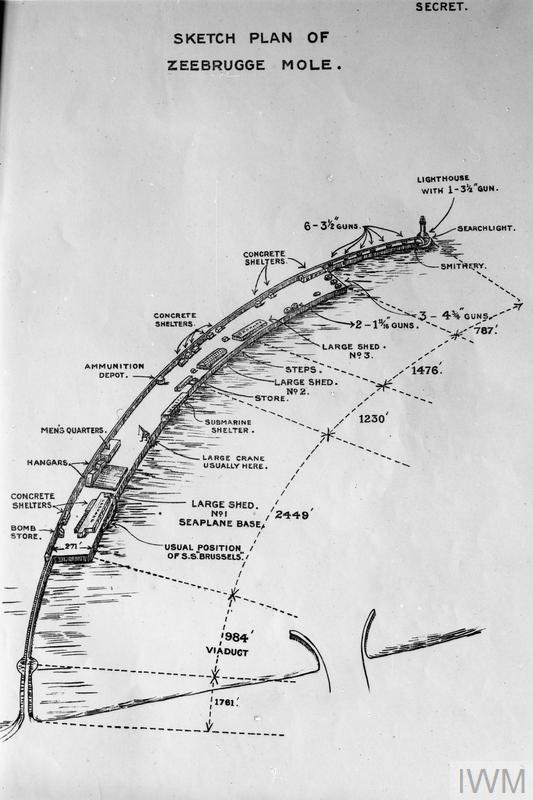
Zeebrugge harbour was an extremely difficult objective to attack. Keyes understood that it was too difficult to destroy the lock gates, as they were half a mile up the canal, and that the channel leading to the gates could be closed by sinking blockships in the entrance.The mouth of the canal was also protected by a Mole (see below), or breakwater, which created an artificial harbour surrounding the entrance. It was a mile and a half long and was linked to the shore by a 300 yard long causeway, half a mile west of the canal mouth.
All along the Mole were German machine gun nests and artillery pieces. With another Battery of 5.9 inch heavy guns behind the Mole itself covering the entrance to the channel. In total more than 1,000 German soldiers and sailors defended the harbour.
Keyes’s overall plan was simple. The Mole would be attacked first by Royal Navy and Royal Marines landing parties, whose objective was to silence the guns. Even if all of the guns were not destroyed the attack would divert their attention from the blockships until it was too late and they were in the canal entrance.
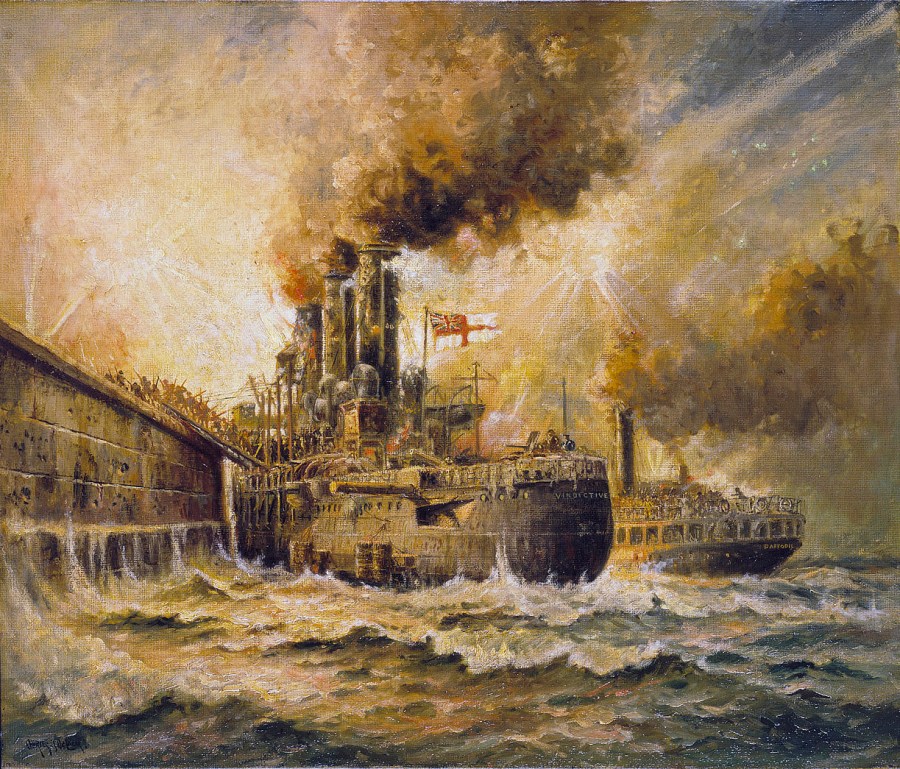
Keyes requisitioned six obsolete Light Cruisers and selected three HMS Thetis, HMS Iphigenia, and HMS Intrepid as the blockships. Another, HMS Vindictive was modified with 18 narrow ramps on her port side, to allow her to carry the majority of the raiding party. Weapons were added where they could be installed. These included two (2) 7.5 inch howitzers, an 11-inch howitzer, sixteen (16) Lewis light machine guns and three quick-firing cannon. Sandbagged huts were built fore and aft, each one enclosing a flamethrower and all of the Cruiser’s exposed positions were covered with sandbags and mattresses.
In addition to the Cruisers, Keyes added two shallow-draft Merseyside ferryboats Iris II and Daffodil, which had all of their internal fittings removed and replaced by armour, smoke-making equipment, grapnels and scaling ladders for the remainder of the storming party.
Rounding out the assault force was two old ‘C’-class submarines C1 and C3 (shown above). Each carried a small crew of six and five tons of explosive. Their mission was to work westward around the Mole to the open pier, wedge themselves beneath it, light the fuses and withdraw via small boat. The resulting explosions would destroy the pier and cutoff the Germans on the Mole.
Unsuitable weather conditions forced two earlier attempts to be aborted but by 22 April conditions had improved. That afternoon the raiding force (consisting of over 165 vessels including Cruisers, Destroyers, Monitors, Submarines and Motor Launches) weighed anchor.
By 10pm the force rendezvoused with patrolling Destroyers and were now only 15 miles from the Mole. At 11:10pm British monitors began bombarding the German coastal defences with fire opening on Zeebrugge twenty minutes later. At the same time coastal motor boats moved off at high speed and laid a preliminary smoke screen across the entire line of advance.
Two groups of coastal motor boats then attacked the western end of the Mole to distract the enemy’s attention while HMS Vindictive approached. Miraculously the entire expedition had reached its destination unreported and unobserved.
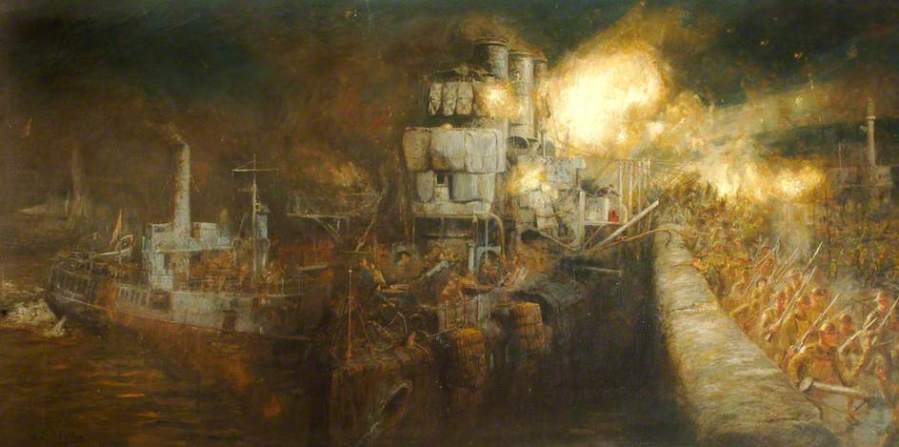
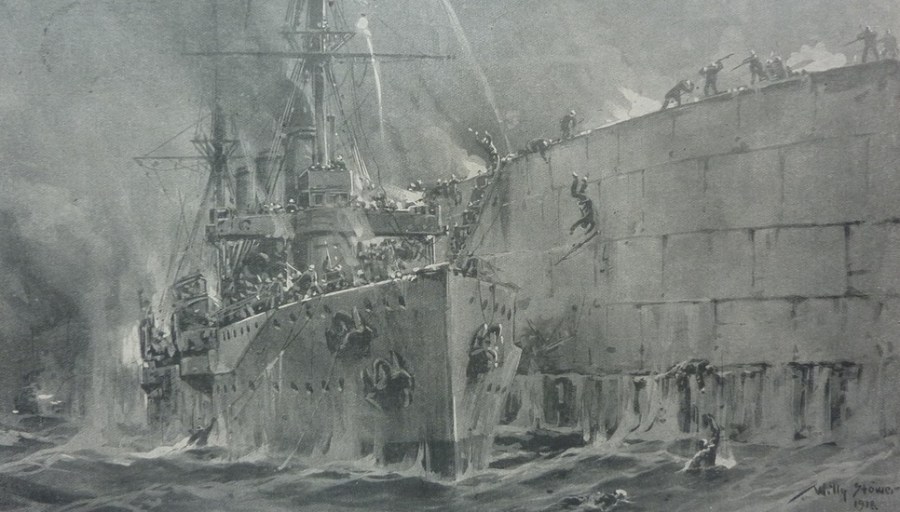
Just before midnight HMS Vindictive came through the last smoke screen, moving across the narrow strip of water that separated her from the Mole. She continued her approach under a hail of fire which inflicted heavy casualties on her crew and the landing parties. The tidal stream was also causing problems as she struggled to lay alongside the mole.
Fortunately the ferry Daffodil saw her predicament and was able to hold HMS Vindictive (see below) alongside the Mole. The first of the storming parties then made their way down the gangways to begin their assault. A few minutes later Iris II was brought alongside.
It was soon realised that there could be no thought of rushing the battery on the Mole head as had originally been intended as HMS Vindictive had gone past her assigned position leaving German machine-guns and barbed wire between the storming parties and the gun emplacements. Consequently the mission changed to one of holding ground, as a diversionary measure, despite the attackers being the focus of nearly every German gun.
By now HMS Vindictive‘s upper-works were being pounded by the gun battery on the Mole and many of her guns had been knocked out as two German Destroyers berthed alongside the inner Mole added their fire to the fight. Twenty minutes after HMS Vindictive had been put alongside the situation ashore was precarious. The Royal Marines had formed a bridgehead opposite the ship’s brows while the seamen had only partially secured HMS Vindictive to the Mole.
Meanwhile the obsolete British submarine HMS C3 under command of Lieutenant Sandford had penetrated the harbour, rammed the viaduct and wedged itself tightly between its steel girders before the crew made their escape in a small skiff under a hail of enemy fire. The resultant explosion blew away 100 feet of the viaduct and cut communications to the Mole as the three British blockships were steaming into the harbour.
The blockships passed through the fire and steamed on towards the channel and canal beyond it. HMS Thetis had by this time sustained heavy damage and was taking on tons of water causing her to list heavily. She was brought to a halt 500 metres from her objective clearing obstacles on her way that allowed HMS Intrepid and HMS Iphigenia to pass through unimpeded.
HMS Intrepid entered the channel first and once inside, was put hard over and scuttled with most of her crew withdrawing in two cutters and a skiff. HMS Iphigenia was not far behind and made for a gap on the eastern side of the channel where she too was successfully scuttled. Her crew escaped in boats which they rowed out of the harbour before being picked up by fast Motor Launches.
Back at the Mole HMS Vindictive continued to draw fire. The recall was sounded and the shore parties withdrew to their battered ships, carrying their wounded with them. Twenty five minutes later HMS Vindictive (see below) and Iris II withdrew and made for open water.
As they left the scene Iris II came under direct fire from the German batteries and was riddled with shells, mortally wounding her Commanding Officer. On fire and with half of her bridge blown away she eventually steamed out of range.
The attack on Zeebrugge proved only a partial success. Although the harbour and canal were blocked for several weeks the Germans soon dredged a channel around the sunken blockships allowing Destroyers and Submarines to pass with extreme difficulty. During the attack 214 British personnel were killed, 383 wounded and 16 taken prisoner.
The exceptional bravery shown by those who took part in the raid was recognised through the award of eight (8) Victoria Crosses (VC), four of which were decided by ballot which allowed for a recipient to be elected by those present at the action when it was considered that the corporate bravery of a unit warranted the award. They were:
Commander (Acting Captain) Alfred Carpenter, Commanding Officer HMS Vindictive
Lieutenant Richard Sandford, Commanding Officer HM Submarine C3
Sergeant Norman Finch, Royal Marine Artillery
Ordinary Seaman Albert McKenzie, HMS Neptune
Lieutenant Commander Arthur Harrison*, HMS Hindustan
On this day one hundred years ago the Germans launched Operation Michael, part of the Kaiserschlacht (Kaiser’s Battle).
Also known as the Spring Offensive it was actually a series of attacks along the Western Front between March and June 1918 during the First World War and marked the deepest advances made by German forces since 1914.
The surrender of the Russians as a result of the signing of the Treaty of Brest-Litovsk at the beginning of March 1918 allowed Germany to move nearly 50 Divisions from the Eastern Front to the Western Front as they realised that their only remaining chance of victory was to defeat the Allies before the arrival of large numbers of American soldiers in France. The Spring Offensive actually consisted of four different operations codenamed Michael, Georgette, Gneisenau, and Blücher-Yorck.
Operation Michael was the main attack intended to break through the Allied lines then outflank and defeat British forces holding the front from the Somme River to the English Channel. Once this was achieved, it was hoped that the French would seek terms for an armistice. The other offensives were subsidiary to Operation Michael and were designed to divert Allied forces away from the main offensive on the Somme.
No clear German objective was established before the start of the Spring Offensive and they changed constantly as the tactical situation developed. In contrast, the Allies concentrated their forces to defend critical areas like the vital rail junction at Amiens and the approaches to the Channel Ports leaving other areas lightly defended.
The Germans were unable to move supplies and reinforcements fast enough to maintain their advance and each offensive subsequently petered out. By late April 1918, the danger of a breakthrough had passed with the German army suffering heavy casualties and now occupying ground that would prove impossible to hold.
At the height of the fighting in early April where the outcome was in the balance, Field Marshal Sir Douglas Haig (shown above), Commander in Chief (CINC) of the British Army in France issued his famous ‘Backs to the Wall’ special Order of the Day (shown below):
‘There is no other course open to us but to fight it out. Every position must be held to the last man: there must be no retirement. With our backs to the wall and believing in the justice of our cause each one of us must fight on to the end. The safety of our homes and the freedom of mankind alike depend upon the conduct of each one of us at this critical moment.’
In August 1918, the Allied counter-offensive began with the support of almost two million American soldiers. The ‘Hundred Days’ Offensive resulted in the Germans retreating or being driven from all of the ground taken in the Spring Offensive, the collapse of the Hindenburg Line and the capitulation of the German Empire, resulting in the Armistice on 11 November 1918.
On this day 75 years ago the Battle of the Ruhr began, a five month campaign of strategic bombing during the Second World War against the heavily defended Ruhr Valley, the industrial heart of Nazi Germany.
The campaign bombed 26 major Combined Bomber Offensive targets including the Krupp armament works at Essen, the Nordstern synthetic oil plant at Gelsenkirchen and the Rheinmetal–Borsig plant in Düsseldorf.
The British bomber force that took part came from RAF Bomber Command and consisted mainly of the twin-engined Vickers Wellington medium bomber and the four-engined Short Stirling, Handley Page Halifax (a famous example ‘Friday the 13th‘ from 158 Squadron RAF is shown below) and Avro Lancaster.
RAF Bomber Command operations were conducted at night with the use of newly developed navigational and blind bombing aids like Oboe, H2S and Gee. The force was also supported by the newly formed 8 (Pathfinder Force) Group RAF (under the command of Australian Air Commodore Don Bennett DSO) to mark the route and aiming points to guide the main Bomber force to the target.
The United States Army Air Force (USAAF) was responsible for the daylight bombing campaign and used two 4-engined bomber aircraft, the Boeing B-17 Flying Fortress (shown below) and Consolidated B-24 Liberator.
The German defence consisted of anti-aircraft artillery (also called “flak”) and day and night fighters. The Kammhuber Line (a section of which is shown below) used radar to identify Allied bombers and then controllers directed day and night fighters onto the bomber stream.
During the battle RAF Bomber Command estimated that 70% of the aircraft lost were due to German fighters. British aircrew called the area ‘Happy Valley’ or the ‘Valley of no Return’.
The Battle of the Ruhr severely disrupted German industry with steel production falling by 200,000 tons, leading to the armaments industry facing a 400,000 ton shortfall. This disruption resulted in the Zulieferungskrise, or sub-components crisis, with monthly armaments production failing to increase between July 1943 and March 1944.
RAF Bomber Command losses during the Battle of the Ruhr were estimated at 4.7% over the 43 attacks with 18,506 sorties flown. Some 5,000 aircrew were lost. In 2012 the Queen unveiled the RAF Bomber Command Memorial (shown above) on Piccadilly at Green Park in Central London. It commemorates the sacrifice of 55,573 aircrew from Britain, Australia, Canada, New Zealand, Czechoslovakia, Poland and other countries of the Commonwealth who lost their lives during the war serving in Bomber Command.
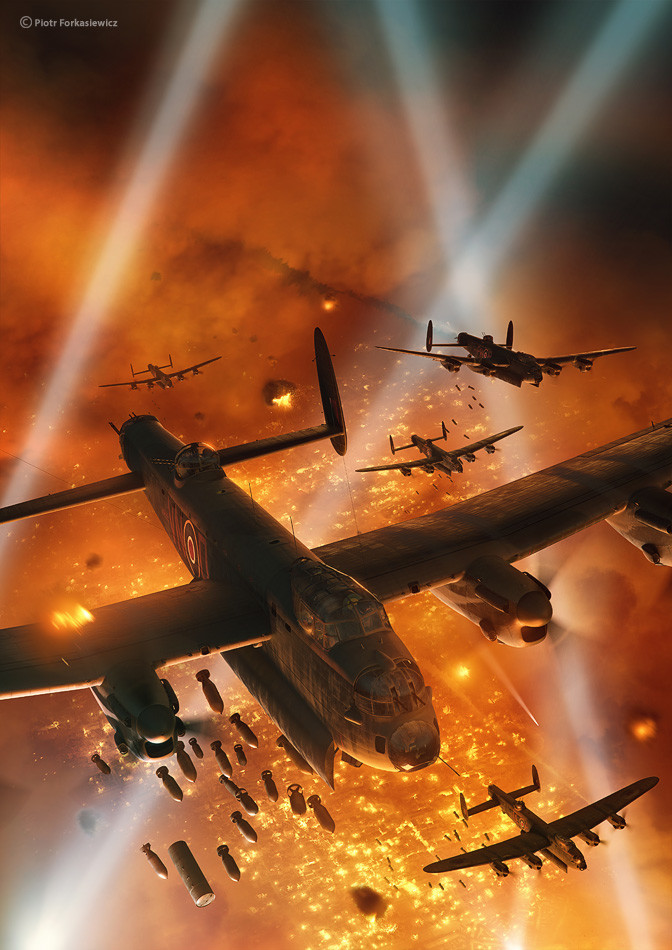
One of my favourite military artists is Piotr Forkasiewicz with some of his imagery shown above. You can see his portfolio of work and purchase prints here: http://peterfor.com/albums/31856
On this day in 1942, HMAS Yarra (U-77) was lost defending a small allied convoy south of Java against overwhelming odds.
A ‘Grimsby class’ sloop, HMAS Yarra was launched at the Cockatoo Island Dockyard, Sydney, in March 1935 and commissioned the following January. Displacing more than 1,000 tons, she was over 80 metres long with a beam of 11 metres and armed with three 4-inch anti aircraft guns, four 3-pounder guns, a quadruple .5-inch anti aircraft machine-gun, and depth charges. She had a top speed of 16.5 knots and a complement of 151.
HMAS Yarra‘s initial war service was in Australian waters, on patrol and escort duties. In August 1940 she left for the Middle East. In April 1941 she escorted a convoy from Bombay to the Persian Gulf followed by service again in the Mediterranean in November-December 1941.
With the outbreak of war with Japan, HMAS Yarra left the Mediterranean for now Indonesian waters, arriving in January 1942. She carried out escort and patrol duties, including the successful rescue of over 1,800 survivors from the troopship Empress of Asia, which was sunk along with many other ships in the convoy BM 12 off the southwest coast of Singapore.
On 27 February 1942 orders were given to clear all remaining allied ships from Batavia (now Jakarta). At about midnight HMAS Yarra and another sloop HMIS Jumna sailed escorting a convoy to Tjilatjap.
Arriving off Tjilatjap (modern day Cilacap) at 11am on 2 March 1942, the ships were warned not to enter harbour. HMAS Yarra was ordered to take the convoy, which consisted of the depot ship Anking, the tanker Francol and the motor minesweeper MMS 51, to Fremantle in Western Australia while HMIS Jumna sailed for Colombo. No time was to be lost, as powerful Japanese naval forces were known to be operating in the waters south of Java.
Steaming south east at an average speed of 8.5 knots, HMAS Yarra and her convoy made steady progress during the night of 2-3 March 1942. The following morning two lifeboats were sighted and HMAS Yarra picked up survivors of the Dutch merchant ship Parigi, which had been sunk by the Japanese two days earlier.
At 6.30am on 4 March 1942, the lookout in HMAS Yarra sighted a Japanese heavy cruiser squadron to the north-east consisting of the IJS Atago (pictured below), IJS Takao and IJS Maya, each armed with ten 8-inch guns, and two destroyers.
Immediately the commander of HMAS Yarra, Lieutenant Commander Robert Rankin (pictured below) made a sighting report, ordered the convoy to scatter and, placed his ship between them and the enemy, laying smoke and preparing to engage.
HMAS Yarra was out-gunned and out-ranged. Against such odds her task was hopeless, yet she kept fighting even as her convoy was overwhelmed and sunk, ship by ship.
Anking received many hits before sinking 10 minutes later. By that time HMAS Yarra was also on fire and listing heavily to port. MMS 51 was on fire and sunk by close range automatic gunfire from one of the Japanese cruisers. The Francol was also hit many times but still remained afloat, finally sinking at about 7.30am. HMAS Yarra, shattered by numerous hits, was the last to go.
Soon after 8.00am, Lt Cdr Rankin ordered abandon ship. Minutes later he was killed when an 8-inch salvo hit the bridge. HMAS Yarra‘s end, which came after close-range shelling by the two Japanese destroyers, was witnessed by 34 survivors on two rafts.
After sinking HMAS Yarra the Japanese cruisers made off to the north-east, picking up one boatload of survivors from Francol as they departed. A collection of boats, rafts and floats was left scattered over a wide area. Before dusk a passing Dutch vessel, Tawali, rescued 57 officers and men from Anking. However, in spite of frantic signals, she failed to sight two Carley floats containing 14 men from MMS 51. For the next two and a half days they drifted about until picked up by the Dutch steamer Tjimanjoek on 7 March.
Meanwhile Yarra’s men, their numbers sadly reduced by wounds, exposure, and thirst, continued to drift helplessly. On 9 March, 13 of the sloop’s ratings were picked up by the Dutch submarine KlL. Of HMAS Yarra‘s complement of 151, 138 (including the Captain and all of the officers) were killed in the action or died subsequently on the liferafts.
In commemoration of Lieutenant Commander Rankin’s leadership commanding HMAS Yarra (II), the sixth and final Collins class submarine (commissioned in 2003) was named in his honour (HMAS Rankin (SSG-78) is pictured below).
On the 4th of March 2014, the then Governor General of Australia, Her Excellency Quentin Bryce AO, CVO presented the current HMAS Yarra (IV) with the Unit Citation for Gallantry (UCG) (insignia shown below) in commemoration of the loss of her predecessor.
“Have you forgotten yet?… For the world’s events have rumbled on since those gagged days, Like traffic checked while at the crossing of city-ways: And the haunted gap in your mind has filled with thoughts that flow Like clouds in the lit heaven of life; and you’re a man reprieved to go, Taking your peaceful share of Time, with joy to spare. But the past is just the same–and War’s a bloody game… Have you forgotten yet?… Look down, and swear by the slain of the War that you’ll never forget.
Do you remember the dark months you held the sector at Mametz– The nights you watched and wired and dug and piled sandbags on parapets? Do you remember the rats; and the stench Of corpses rotting in front of the front-line trench– And dawn coming, dirty-white, and chill with a hopeless rain? Do you ever stop and ask, ‘Is it all going to happen again?’
Do you remember that hour of din before the attack– And the anger, the blind compassion that seized and shook you then As you peered at the doomed and haggard faces of your men? Do you remember the stretcher-cases lurching back With dying eyes and lolling heads–those ashen-grey Masks of the lads who once were keen and kind and gay?
Have you forgotten yet?… Look up, and swear by the green of the spring that you’ll never forget.”
At the centenary commemorations of the Battle of the Somme in 2016 the actor Charles Dance gave a beautiful rendition of this poem. You can view it here: https://www.youtube.com/watch?v=1Ks-x5Dfj5k
*this poem was very popular in the 1920s and often formed part of Remembrance services held throughout Britain and her Dominions.
Friday 10 November 2017 marks the centenary of the end of the Third Battle of Ypres, more commonly referred to as ‘Passchendaele’.
The Third Battle of Ypres was the major British offensive in Flanders in 1917. It was planned to break through the strongly fortified and in-depth German defences enclosing the Ypres salient, a protruding bulge in the British front line, with the intention of sweeping through to the German submarine bases on the Belgian coast. The battle comprised of a series of limited and costly offensives, often undertaken in the most difficult of waterlogged conditions – a consequence of frequent periods of rain and the destruction of the Flanders’ lowlands drainage systems by intense artillery bombardment. As the opportunity for breakthrough receded, Sir Douglas Haig still saw virtue in maintaining the offensives, hoping in the process to drain German manpower through attrition. The main battles associated with Third Battle of Ypres were:
– Pilckem, 31 July to 2 August
– Langemarck, 16-18 August
– Menin Road, 20-25 September
– Polygon Wood, 26 September to 3 October
– Broodseinde, 4 October
– Poelcapelle, 9 October
– Passchendaele (First Battle), 12 October
– Passchendaele (Second Battle), 26 October to 10 November.
Australian Divisions participated in the battles of Menin Road, Polygon Wood, Broodseinde, Poelcapelle and the First Battle of Passchendaele. In eight weeks of fighting Australian forces incurred 38,000 casualties. The combined total of British and Dominion casualties has been estimated at 310,000 (estimated German losses were slightly lower) and no breakthrough was achieved. The costly offensives, ending with the capture of Passchendaele village, merely widened the Ypres salient by a few kilometres.
* Taken from Siegfried Sassoon’s poem ‘Memorial Tablet’ written by him in October 1918 and first published the following year.