Naval News – HMAS Brisbane (DDG 41) commissions

NUSHIP-Brisbane (1)

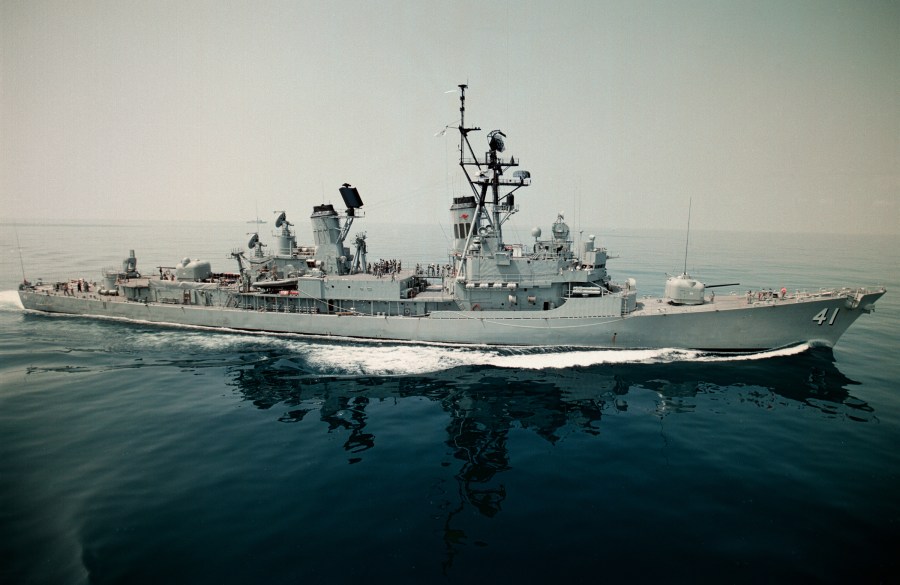
HMAS Brisbane (DDG 41), the second of three Hobart Class Air Warfare Destroyers (DDGs) formally commissioned into the Royal Australian Navy (RAN) Surface Fleet on Monday 10 September 2018.

Laid down in 2014 she was launched in December 2016 and began Sea Trials in November 2017 before being accepted by the Department of Defence in July 2018.

crest_brisbane

The ship’s motto is ‘We aim at higher things’ and she inherits three (3) battle honours from the two previous RAN ships of the same name:

INDIAN OCEAN 1917

VIETNAM 1969-71

KUWAIT 1991

The last ship to carry the same name was HMAS Brisbane II (shown below), a Perth Class Guided Missile Destroyer, which was decommissioned in 2001.

Film

You can find out more about her here:  hthttp://www.navy.gov.au/nuship-brisbane-iii


On this day – The Battle of Fire Support Base ‘Coral’ begins – 13 May 1968

1RAR at Coral

On this day 50 years ago the battle of Fire Support Base ‘Coral’ began, the largest land battle fought by Australian forces during the Vietnam War.

Australian soldiers were first deployed to South Vietnam in 1962 as a small training team (the AATTV). In 1965 a Battalion Group, based on the 1st Battalion, The Royal Australian Regiment (1 RAR) was attached to the US 173rd Airborne Brigade. In 1966 Australia’s commitment was increased to a Brigade, the 1st Australian Task Force (1 ATF), units of which fought their first major action at Long Tan in August that year.

102 Bty arrive at Coral 2

During the ‘Mini-Tet’ offensive launched by the Viet Cong (VC) and North Vietnamese Army (NVA) in May 1968 1 ATF deployed two of its three battalions to an area 20 kilometres north of Bien Hoa to intercept and disrupt enemy forces withdrawing from Saigon and the Bien Hoa–Long Binh base complex.

Coral looking East

A number of fire support bases (FSB) were established to provide temporary defensive positions with Artillery and Mortars in order to support infantry foot patrols from 1 RAR and 3 RAR. One of these FSBs was called ‘Coral’ located seven (7) kilometres north of the town of Tan Uyen.

Aerial view of FSB Coral 13 May 1968

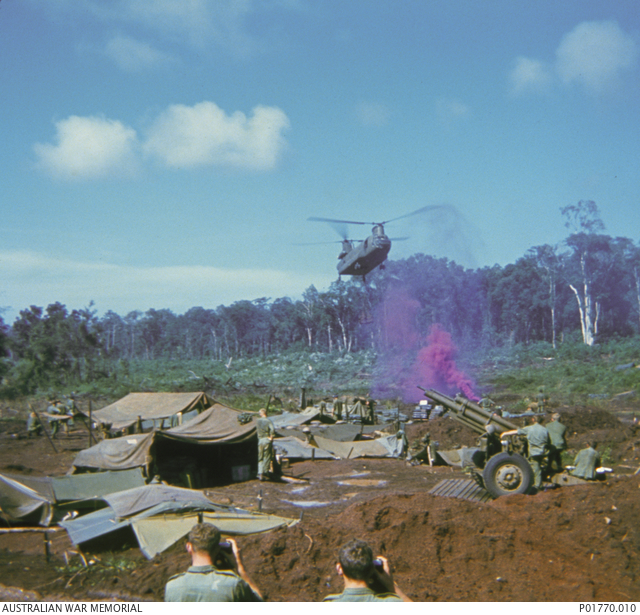
The occupation of FSB Coral (shown above) began on 12 May 1968. Early the following morning at 3.30am the base was attacked by the NVA and VC with the Mortar Platoon of 1 RAR and Number 6 Gun (an M2A2 Howitzer shown below) of 102 Field Battery over-run. The attack was beaten off by 6.30am and the captured positions retaken. Eleven Australian soldiers were killed and 28 wounded with 52 NVA/VC bodies left behind on the battlefield. A further three Australians died in patrol clashes around FSB Coral on 14 May.

102 Bty No 6 Gun

At 2.30 am on 16 May 1968 FSB Coral was attacked again by a much larger force of three (3) battalions of NVA. Coral was now defended by M113 Armoured Personnel Carriers (APCs) of A Squadron, 3rd Cavalry Regiment (3 CAV) and 1 RAR’s rifle companies. All of these positions were heavily engaged with part of the A Coy 1 RAR position lost before the enemy was forced to withdraw. The attack was repelled after four hours of fighting, with the Australians losing five (5) men killed and 19 wounded. Two (2) members of an American artillery battery which had reinforced the base were also wounded. Only 34 enemy bodies were recovered, but blood trails and drag marks indicated that many more casualties had been removed.

On 22 May FSB Coral was subjected to yet another rocket and mortar barrage, but this time the NVA troops were dispersed by mortar fire from 1RAR mortars as they formed up to attack.

Although there were further bombardments on 26 and 28 May, with numerous patrols sent out coming into contact with the enemy, FSB Coral was not seriously threatened again.

During fighting on 26 May a Troop of Centurion tanks from C Squadron, 1st Armoured Regiment deployed outside the perimeter wire with infantry support and engaged and destroyed a significant portion of an NVA bunker system.

Centurions at Coral

Enemy efforts shifted on 26 May to another FSB named ‘Balmoral’ 4.5 kilometres north of Coral occupied by 3 RAR and Centurion tanks. The defenders threw back assaults launched against FSB Balmoral on 26 and 28 May 1968.

102 Battery Honour Title

On the forttieth anniversary of the Battle of Coral in 2008, the then Governor General of Australia His Excellency Major General Mike Jeffrey AC, CVO, MC presented 102 Battery Royal Australian Artillery (RAA) with the Honour Title ‘Coral’ (see below). 102 Battery is the first Australian Artillery unit to be awarded an Honour Title, which are common in the British Army and are the Artillery equivalent of Battle Honours.

20080514adfGPA060764_029

102 (Coral) Battery RAA remains on the Australian Army Order of Battle and currently is a Gun Battery equipped with the 155mm M777A2 towed lightweight howitzers (see below) and part of the 8th/12th Regiment RAA. You can find out more about the Regiment here: https://www.army.gov.au/our-people/units/forces-command/1st-brigade/8th12th-regiment

Exercise Koolendong 2016

You can find out more about the Battle of Coral-Balmoral here: https://www.awm.gov.au/articles/encyclopedia/coral


Customs and Traditions – Anzac Day

HMAS Choules

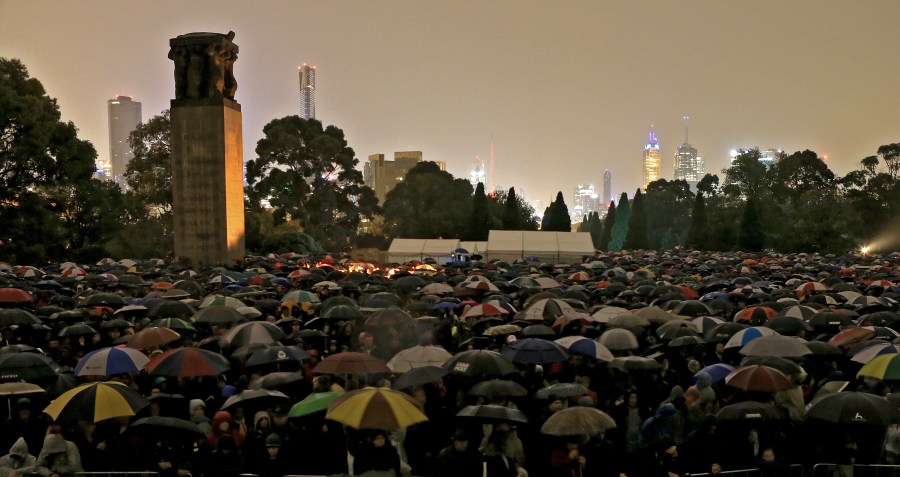
Anzac Day is traditionally held on 25 April each year throughout Australia and New Zealand as a day to remember all those who have served and died in war, conflict or peacekeeping operations.

On that day in 1915, Australian and New Zealand forces (called the Australian and New Zealand Army Corps or ‘ANZAC’) landed with other British and French troops on the Gallipoli peninsula in an attempt to knock Turkey out of the war.

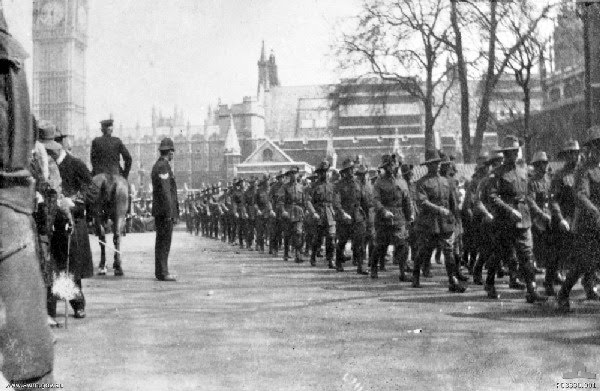
The 25th of April was officially named Anzac Day in 1916 and for the remaining years of the First World War was commemorated with parades and commemorative church services.

1 Div London 1916

During the 1920s, Anzac Day became established as a National Day of Commemoration and in 1927 Australian states observed some form of public holiday together on Anzac Day for the first time that year. By the 1930s all the rituals now associated with Anzac Day including dawn vigils, marches, memorial services, reunions, and games like two-up were firmly established.

One of the more poignant events held on every Anzac Day is the ‘Dawn Service’ with the first organised service held in 1928 at Martin Place in Sydney. The impetus for the event came the previous year when a group of returned servicemen returning at dawn from an Anzac Day function held the night before came upon an elderly woman laying flowers at the as yet unfinished Sydney Cenotaph. Joining her in this private remembrance, the men later resolved to institute a Dawn Service the following year. Some 150 people gathered at the Sydney Cenotaph in 1928 for a wreathlaying and two minutes’ silence and the modern tradition was born.

Anzac Day 2017

Another well known tradition held on Anzac Day is the game ‘two-up’. The origins of the game are obscure but it is thought to have evolved from ‘pitching pennies’, a gambling game where a single coin is tossed against a wall with the closest to the wall winning the bet and collecting all of the coins, which was popular with the British working class and had been played by British and Irish convicts since the arrival of the First Fleet in 1788.

Kip

‘Two-up’ involves someone acting as the ‘Spinner’ using a ‘kip’ (a small piece of wood on which the coins are placed – see above) to toss two Australian penny coins in the air. Other players surround the ring and bet on the result – either heads or tails. ‘Odds’, where a head and tail results, means the ‘Spinner’ throws again.

You can find out more about Anzac Day here: https://www.awm.gov.au/commemoration/anzac-day


On this day – The loss of HMAS Yarra (U77) – 4 March 1942

HMAS Yarra Canberra Times 14 March 1942

On this day in 1942, HMAS Yarra (U-77) was lost defending a small allied convoy south of Java against overwhelming odds.

A ‘Grimsby class’ sloop, HMAS Yarra was launched at the Cockatoo Island Dockyard, Sydney, in March 1935 and commissioned the following January. Displacing more than 1,000 tons, she was over 80 metres long with a beam of 11 metres and armed with three 4-inch anti aircraft guns, four 3-pounder guns, a quadruple .5-inch anti aircraft machine-gun, and depth charges. She had a top speed of 16.5 knots and a complement of 151.

HMAS Yarra‘s initial war service was in Australian waters, on patrol and escort duties. In August 1940 she left for the Middle East. In April 1941 she escorted a convoy from Bombay to the Persian Gulf followed by service again in the Mediterranean in November-December 1941.

With the outbreak of war with Japan, HMAS Yarra left the Mediterranean for now Indonesian waters, arriving in January 1942. She carried out escort and patrol duties, including the successful rescue of over 1,800 survivors from the troopship Empress of Asia, which was sunk along with many other ships in the convoy BM 12 off the southwest coast of Singapore.

On 27 February 1942 orders were given to clear all remaining allied ships from Batavia (now Jakarta). At about midnight HMAS Yarra and another sloop HMIS Jumna sailed escorting a convoy to Tjilatjap.

HMAS Yarra II

Arriving off Tjilatjap (modern day Cilacap) at 11am on 2 March 1942, the ships were warned not to enter harbour. HMAS Yarra was ordered to take the convoy, which consisted of the depot ship Anking, the tanker Francol and the motor minesweeper MMS 51, to Fremantle in Western Australia while HMIS Jumna sailed for Colombo. No time was to be lost, as powerful Japanese naval forces were known to be operating in the waters south of Java.

Steaming south east at an average speed of 8.5 knots, HMAS Yarra and her convoy made steady progress during the night of 2-3 March 1942.  The following morning two lifeboats were sighted and HMAS Yarra picked up survivors of the Dutch merchant ship Parigi, which had been sunk by the Japanese two days earlier.

At 6.30am on 4 March 1942, the lookout in HMAS Yarra sighted a Japanese heavy cruiser squadron to the north-east consisting of the IJS Atago (pictured below), IJS Takao and IJS Maya, each armed with ten 8-inch guns, and two destroyers.

IJS Atago

Immediately the commander of HMAS Yarra, Lieutenant Commander Robert Rankin (pictured below) made a sighting report, ordered the convoy to scatter and, placed his ship between them and the enemy, laying smoke and preparing to engage.

Robert Rankin

HMAS Yarra was out-gunned and out-ranged. Against such odds her task was hopeless, yet she kept fighting even as her convoy was overwhelmed and sunk, ship by ship.

Anking received many hits before sinking 10 minutes later. By that time HMAS Yarra was also on fire and listing heavily to port. MMS 51 was on fire and sunk by close range automatic gunfire from one of the Japanese cruisers. The Francol was also hit many times but still remained afloat, finally sinking at about 7.30am. HMAS Yarra, shattered by numerous hits, was the last to go.

HMAS Yarra 2

Soon after 8.00am, Lt Cdr Rankin ordered abandon ship. Minutes later he was killed when an 8-inch salvo hit the bridge. HMAS Yarra‘s end, which came after close-range shelling by the two Japanese destroyers, was witnessed by 34 survivors on two rafts.

HMAS Yarra Ships Crest

After sinking HMAS Yarra the Japanese cruisers made off to the north-east, picking up one boatload of survivors from Francol as they departed. A collection of boats, rafts and floats was left scattered over a wide area. Before dusk a passing Dutch vessel, Tawali, rescued 57 officers and men from Anking. However, in spite of frantic signals, she failed to sight two Carley floats containing 14 men from MMS 51. For the next two and a half days they drifted about until picked up by the Dutch steamer Tjimanjoek on 7 March.

Meanwhile Yarra’s men, their numbers sadly reduced by wounds, exposure, and thirst, continued to drift helplessly. On 9 March, 13 of the sloop’s ratings were picked up by the Dutch submarine KlL. Of HMAS Yarra‘s complement of 151, 138 (including the Captain and all of the officers) were killed in the action or died subsequently on the liferafts.

Rankin crest

In commemoration of Lieutenant Commander Rankin’s leadership commanding HMAS Yarra (II), the sixth and final Collins class submarine (commissioned in 2003) was named in his honour (HMAS Rankin (SSG-78) is pictured below).

HMAS Rankin at Beuaty Point TAS

On the 4th of March 2014, the then Governor General of Australia, Her Excellency Quentin Bryce AO, CVO presented the current HMAS Yarra (IV) with the Unit Citation for Gallantry (UCG) (insignia shown below) in commemoration of the loss of her predecessor.

Unit Citation for Gallantry

You can find out more about HMAS Yarra (II) here: http://www.navy.gov.au/hmas-yarra-ii

You can find out more about HMAS Rankin here: http://www.navy.gov.au/hmas-rankin

You can find out more about the presentation of the Citation here: http://news.navy.gov.au/en/Mar2014/Events/890/Brave-crew-recognised-for-extraordinary-acts-of-gallantry-in-1942.htm#.WlLvzFWWbIU

Famous Squadrons – 450 Squadron, Royal Australian Air Force (RAAF) – ‘The Desert Harassers’

450 Sqn RAAF Operation Bowler

450 Squadron, Royal Australian Air Force (RAAF) was formed on 16 February 1941 at RAAF Williamtown near Newcastle in New South Wales as the first Australian squadron established under Article XV of the Empire Air Training Scheme (EATS).

450 Sqn Kittyhawks

Nicknamed the ‘Desert Harassers’, the Squadron was one of the most famous RAAF units of the Second World War and derived its nickname from taunts made by the German propaganda broadcaster ‘Lord Haw Haw’ who, during the squadron’s operations in the Western Desert branded it a band of “Australian mercenaries whose harassing tactics were easily beaten off by the Luftwaffe”.

450 Sqn crest

Motto: ‘Harass’

Battle Honours: 10

  • South-East Europe 1942-1945
  • Egypt and Libya 1940-1943
  • El Alamein
  • El Hamma
  • North Africa 1942-1943
  • Sicily 1943
  • Italy 1943-1945
  • Gustav Line
  • Gothic Line
  • Syria 1941

450 Sqn Bombing up a Fighter Bomber

450 Squadron’s war ended with the surrender of German forces in Italy on 2 May 1945. It was disbanded at Lavarino in Italy on 20 August 1945.

450 Sqn Plaque

The 450 Squadron ‘number plate’ was inadvertently given to the Royal Canadian Air Force (RCAF) after the Second World War. Although Canadian squadrons were numbered from 400 to 449 during the war, an unusual twist of history resulted in the number 450 being allocated to a Canadian heavy transport squadron. Nevertheless, Canada received permission to adopt the number and 450 Heavy Transport Helicopter Squadron was formed at RCAF Station St. Hubert, Quebec on March 29, 1968. Whilst the Squadron inherited the 450 number plate it did not inherit the above Battle Honours.

You can find out more about the 450 Sqn RAAF Assocation here: http://www.450squadronraaf.org.au/

On this day – Australia’s worst peacetime naval disaster – HMAS Melbourne (R21) and HMAS Voyager (D04) collide at night off Jervis Bay

HMAS Voyager

On this day in 1964 what is considered to be Australia’s worst peacetime naval disaster occurred 20 nautical miles off Point Perpendicular near Jervis Bay in New South Wales, when at 8.56pm the Majestic class aircraft carrier HMAS Melbourne (R21) and the Daring class destroyer HMAS Voyager (D04) collided at night during manoeuvres.

At the time HMAS Melbourne was performing flying exercises and HMAS Voyager was performing plane guard duties, positioned behind and to port (left) in order to rescue any aircrew if a plane was forced to ditch.

HMAS Melbourne following Voyager collision

After a series of turns effected to reverse the course of the ships HMAS Voyager ended up ahead and starboard (right) of HMAS Melbourne. Voyager was then ordered by Melbourne to resume plane guard position, which involved turning to starboard, but then she came around to port. The crew on the bridge of HMAS Melbourne thought that Voyager was zig-zagging and would turn to starboard and resume her correct position.

At 8.55pm both ships began desperate avoiding manoeuvres but a collision was inevitable. One minute later the bow of HMAS Melbourne (travelling at about 22 knots) struck behind the Bridge and Operations Room of HMAS Voyager, effectively cutting the ship in two.

Over the coming hours, frantic efforts were made to rescue the crew of HMAS Voyager, with helicopters from both HMAS Melbourne and Naval Air Station (NAS) Nowra, as well as five Minesweepers and two search and rescue boats were dispatched from the shore establishment HMAS Creswell, moving to the scene to pick up survivors.

HMAS Voyager Crest

Sadly, of the 314 crew on board HMAS Voyager, 82 were killed, most of whom died immediately or were trapped in the bow section, which sank after 10 minutes. HMAS Melbourne was damaged, but suffered no fatalities.

CPO Rogers GC DSM

One particular crew member of HMAS Voyager showed great bravery and sadly lost his life as a result. Chief Petty Officer Jonathan Rogers DSM, a Welshman and Second World War Royal Navy  veteran, along with 50 other men, was trapped in the sinking forward part of the stricken destroyer.

Recognising that he was too large to fit through the escape hatch, he organised the evacuation of those that could escape, then led his trapped comrades in a prayer and hymn as they met their fate. He was posthumously awarded the George Cross (GC), which is now held by the Australian War Memorial.

CPO Rogers GC DSM Medal Collection

Following the disaster two Royal Commissions were held in 1964 and 1968. The first Royal Commission ruled that the collision was the fault of HMAS Voyager’s bridge crew and also blamed the Commanding Officer of HMAS Melbourne, Captain John Robertson and two other officers on that ship. Robertson resigned after the first Royal Commission, rather than accept a shore posting to HMAS Watson (in effect a demotion) and was widely seen in the media as a scapegoat for the incident.

In 1967 a second Royal Commission was announced following increasing pressure from the public and the media, including claims made that the Commanding Officer of HMAS Voyager, Captain Duncan Stevens (who had died in the tragedy), was a heavy drinker and unfit for command. The second Royal Commission came to that finding and absolved Captain Robertson and the two other officers from HMAS Melbourne, of any blame.

You can find out more about HMAS Voyager (II) here: http://www.navy.gov.au/hmas-voyager-ii

On this day – Queen Victoria approves the introduction of the Victoria Cross (VC) awarded for gallantry ‘in the face of the enemy’ – 29 January 1856

Victoria Cross

The Victoria Cross, Britain’s (and some Commonwealth countries) highest award for gallantry for members of the Armed Forces, was officially constituted by warrant on this day in 1856.

Since that time the medal has been awarded 1,358 times to 1,355 individual recipients. Only 15 medals have been awarded since the Second World War.

As of 2018, there are six (6) living recipients of the Victoria Cross, three (3) living recipients of the Victoria Cross for Australia and one (1) living recipient of the Victoria Cross for New Zealand. They are:

  • Flight Lieutenant John Cruickshank VC, 210 Sqn RAF (awarded  for his actions in the Battle of the Atlantic in 1944)
  • Sergeant Bill Speakman VC, Black Watch attached to King’s Own Scottish Borderers (awarded for his actions in Korea in 1951)
  • Captain Rambahadur Limbu, VC, MVO, 2nd Battalion, 10th Princess Mary’s Own Gurkha Rifles (awarded for his actions in Borneo in 1965)
  • Warrant Officer Class 2 Keith Payne VC, AM, Australian Army Training Team Vietnam (awarded for his actions in South Vietnam in 1969)
  • Corporal Willie Apiata VC, New Zealand Special Air Service Regiment (awarded for his actions in Afghanistan in 2004
  • Lance Sergeant Johnson Beharry, VC, CNG, 1st Battalion, The Princess of Wales’s Royal Regiment (awarded for his actions in Iraq in 2005)
  • Corporal Mark Donaldson VC, Australian Special Air Service Regiment (awarded for his actions in Afghanistan in 2008)
  • Corporal Ben Roberts-Smith VC, MG, Australian Special Air Service Regiment (awarded for his actions in Afghanistan in 2010)
  • Corporal Dan Keighran VC, 6th Battalion, The Royal Australian Regiment (awarded for his actions in Afghanistan in 2010)
  • Corporal Joshua Leakey VC (shown below), 1st Battalion, The Parachute Regiment (awarded for his actions in Afghanistan in 2015)

Joshua Leakey VC

The largest collections of VCs in the world are held by the Ashcroft Collection in Britain (established in 1986) which now contains 210 medals and the Australian War Memorial, which has 69 medals on public display.

You can find out more about the Ashcroft Collection here: http://www.lordashcroftmedals.com/

You can find out more about the AWM collection here: https://www.awm.gov.au/articles/encyclopedia/vic_cross


Army News – 9th Regiment, Royal Australian Artillery (9 Regt RAA) re-formed to command all Army Reserve Light Batteries

F2 Mortar

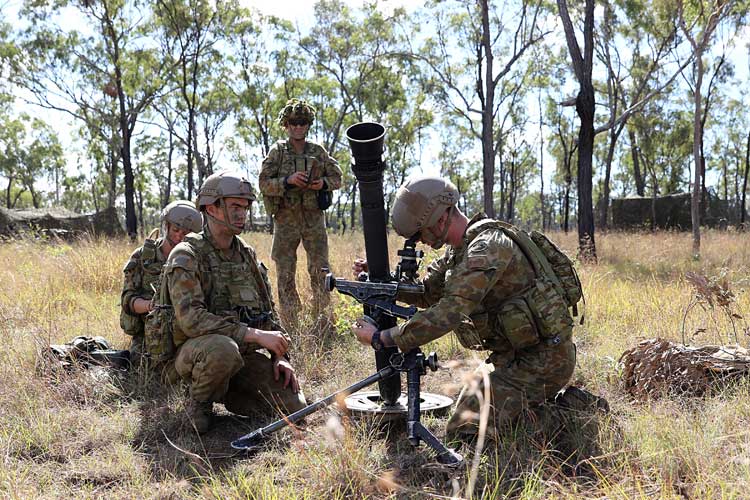
9th Regiment, Royal Australian Artillery (9 Regt RAA) was re-formed on 15 January 2018 to command all of the Army Reserve (ARes) Light Batteries, who previously from 2013 onward were placed under operational command (OPCOM) of Infantry battalions, providing indirect fire support utilising F2 81mm Mortars.

RAA Badge           9 Regt RAA Unit Colour Patch

RHQ 9 Regt RAA is based at Kogarah Multi-user Deport (MUD) in Sydney and now commands the following sub-units:

  • 2nd/10th Light Battery (formerly part of the 5th/6th Battalion, The Royal Victoria Regiment the based in St Kilda in Melbourne)
  • 3rd Light Battery (formerly part of the 11th/28th Battalion, The Royal Western Australia Regiment based at Irwin Barracks in Perth)
  • 5th/11th Light Battery (formely part of the 25/49th Battalion, The Royal Queensland Regiment based at Gallipoli Barracks in Brisbane and across south eastern Queensland)
  • 6th/13th Light Battery (formerly part of the 10th/27th Battalion, The Royal South Australian Regiment based at Keswick Barracks in Adelaide and Glenorchy in Hobart)
  • 7th Light Battery (formerly part of the 2nd/17th Battalion, The Royal New South Wales Regiment based at Dee Why and Adamstown in Sydney)
  • 23rd Light Battery (formerly part of the 4th/3rd Battalion, The Royal New South Wales Regiment based at Kogarah in Sydney)

9 Regt RAA takes its lineage from the 9th Australian Field Artillery (AFA) Brigade (part of the 3rd Australian Division in the First World War) and 2/9th Field Regiment RAA (part of the 8th Australian Division in the Second World War). Each of the above Batteries also take their own lineage from predecessor Regiments and Batteries stretching back to before Federation in 1901.

You can find out more about the Royal Australian Artillery here: https://www.army.gov.au/our-people/corps/royal-regiment-of-australian-artillery

On this day – 2nd Australian Light Horse Regiment capture the standard of the 80th Turkish Infantry Regiment during the battle of Magdhaba – 23 December, 1916

80th Turkish Infantry Regiment Standard

This Turkish Standard was captured by Squadron Quartermaster Sergeant (SQMS) Dennis Walker, of the 2nd Light Horse Regiment AIF (2 LH) during the Battle of Magdhaba, on 23 December 1916.

Magdhaba, a village in the northern Sinai desert was occupied by Turkish forces blocking the route to Palestine, was attacked by the ANZAC Mounted Division and the Imperial Camel Corps. After a night march of 22 miles from El Arish the hard fought action was secured by a bayonet assault by the 1st Light Horse Brigade, of which the 2nd Light Horse Regiment was a part, just as the entire Division had been ordered to withdraw.

Walker captured the standard of the 80th Turkish Infantry Regiment from a Turkish officer who was struggling to remove it from it from its elaborate pole and cords. In the process the standard was torn and Walker repaired it with black thread the following night.

The Standard is made of crimson silk with a gold bullion fringe on the upper and lower edges, and on the fly.

One side of the standard is embroidered in gold bullion thread with the toghra (personal cypher) of the Ottoman Sultan Mehmet V (1909-1918) within a circle. The circle is surrounded by embroidered representations of four regimental flags and various military symbols, including pikes, double-headed axes and trumpets. Beneath is a scroll of leaves from which are suspended embroidered representations of five medals.

The other side of the standard is also embroidered in gold and shows two texts from the Koran written in arabic script. They translate as ‘There is no god but God‘ and ‘Mohammed, the Messenger of God‘.

The Standard is one of at least three captured in the course of the campaign in Palestine. All are now in the collection of the Australian War Memorial.

You can find out more about the successor to 2 LH, the 2nd/14th Light Horse Regiment here: https://www.army.gov.au/our-people/units/forces-command/7th-brigade/2nd14th-light-horse-regiment-queensland-mounted-infantry


Naval News – Missing Australian World War 1 Submarine AE1 found off the coast of New Guinea after 103 years

AE!

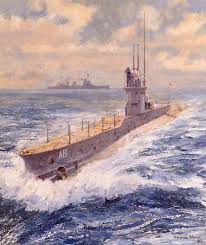
The Royal Australian Navy (RAN) announced today that they have discovered the wreck of the Australian WW1 submarine AE1 (shown above), which had been missing for over a century.

AE1

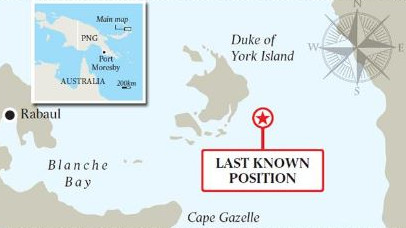
HMAS AE1 (originally known as just AE1) was an E-class submarine and the first to serve in the RAN. She was lost at sea with all hands near East New Britain, Papua New Guinea, on 14 September 1914, after less than seven months in service.

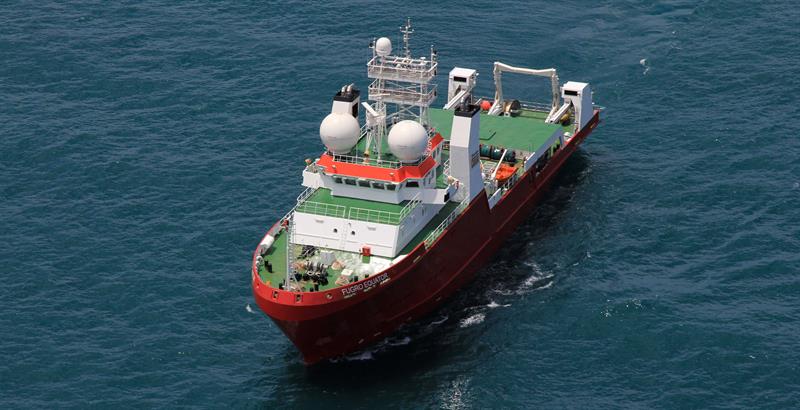
AE1 was discovered by a team led by the Submarine Institute of Australia on board the specialist Dutch survey ship the MV Fugro Equator (shown below). With $1 million in funding from the Australian Government and a private consortium they had commenced their search last Sunday.

Fugro Equator.jpg

They discovered that the boat suffered a catastrophic failure, probably during a practice dive, and struck a hard rocky bottom southeast of the Duke of York islands group.

AE1 Mao

The precise location of the wreck, and even details of the time it was discovered, are being kept secret to protect it from unauthorised salvage attempts.

It is understood there is no intention of attempting to retrieve the submarine, resting at a depth of more than 300 metres, which is regarded as a war grave.

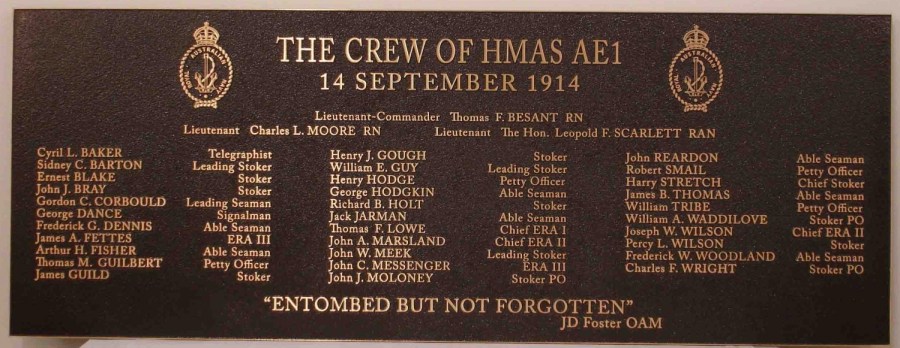
AE1 Memorial Plaque

There had been several previous attempts over the years to locate the vessel, all unsuccessful. MV Fugro Equator is a specially designed offshore survey ship, that was involved in the search for Malaysian Airlines Flight MH370.

You can find out more about AE1 here: http://www.navy.gov.au/hmas-ae1